X
GO

Making Melody - Free Quilt Pattern by Elisa Backporch Design

Summary

Making Melody - Free Quilt Pattern by Elisa Backporch Design - EBD 1103

Rating: Not enough ratings.
Your rating: Sign in to rate

Making Melody - Free Quilt Pattern by Elisa Backporch Design

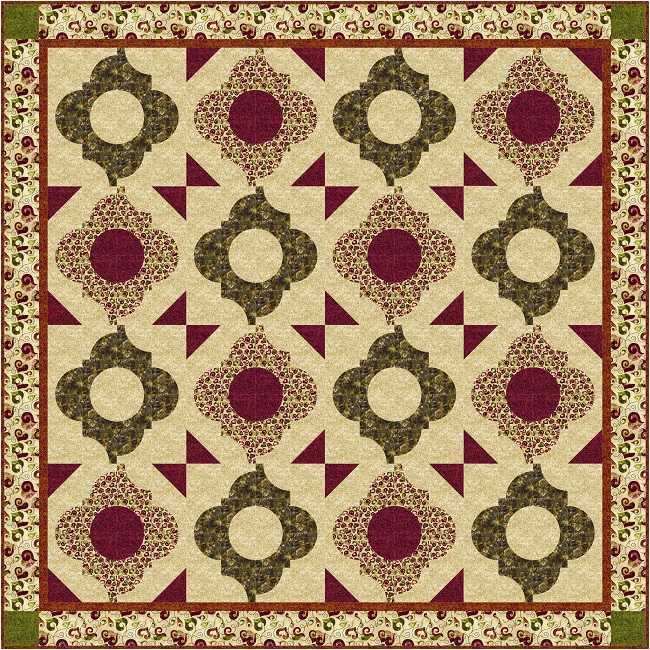
Making Melody by Elisa Wilson
75" x 75"
Featuring the 4" Drunkards Path Template by
Elisa's Backporch Design
Fabric is Change of Heart in Red & Tan by Northcott.com
©2011 Elisa Wilson All Rights Reserved

❖   This pattern features the 4" Drunkards Path Template (optional purchase here).

❖   You will be making drunkards path blocks that measure 4 1/2" unfinished size.  4" finished size.

❖   Paper templates are provided (download here) but it is highly recommended that you purchase the acrylic templates (here) for ease and accuracy in cutting.

❖   Width of fabric (WOF) is based on 40" of usable fabric.

❖   I do not wash my fabric before using. Add extra fabric if you wish to wash before using.

❖   All seams are 1/4".

❖   Press fabrics with a hot iron. Be careful not to distort fabric while pressing. Use a light spay starch if desired.

❖   Curves are sewn using your quarter inch presser foot. Practice with some scrap fabric before beginning.

❖   You can find online sewing tutorials for sewing curves http://blog.backporchdesign.com   


Read through pattern before beginning.

A little time spent in the beginning will help to make your quilting experience a joyful one.


Amount

Cut

Red/orange

Inner border & binding

24"

Cut 5 strips 1 1/2" wide for inner border

Cut 6 strips 2 1/2" wide for binding

5/8 binding - cut 8 strips 2 1/2" wide

Light background

116"

Cut 96 shape A

Cut 64 shape B

Cut 32 squares 4 1/2"

Cut 16 squares 5" for HST

Red

22"

Cut 32 shape B

Cut 16 squares 5" for HST

Medium Green

Corner squares

4 1/2"

Cut one strip 4 1/2" wide. Sub cut four 4 1/2" squares for outer border

Small heart or floral

50"

Cut 48 shape A

Cut 48 shape B

Dark Green

50"

Cut 48 template shape A

Cut 48 template shape B

Large heart print

Outer border

32"

Cut 7 strips 4 1/2" wide for outer border

7 yards

Backing


Cutting


To cut template shapes A and B cut a strip of fabric slightly wider than the template shape.

Cut a 5" x WOF strip. If using the acrylic templates place up to four layers of fabric and cut around template shape with your rotary cutter. Rotate template and cut another shape. You can get about 14 of shape B and 12 of shape A from a strip of fabric.


1.  Sew the shape B to the shape A.

       a.   Fold shape A and B in half along the curve side to find the center and make a light crease. Be careful not to stretch the fabric. Shape B will be on top.
  b.   Place the fabrics right sides together, shape B on top, lining up the crease marks to match the centers of the curve. Place a pin.  
  c.   Align the top edges. Take a few stitches (be sure to use a 1/4" foot) and leave the needle in the down position.
  d.   Place your right index finger in between the two fabrics. Your index finger is guiding the bottom fabric and and keeping it smooth. It is also lifting the top fabric as you slowly sew around the curve letting the curved edges fall together.  
  e.   Remember that you do not have to match the curved sections ahead of time, the only place it needs to match is right before it goes under the presser foot.
  f.   Your left hand is holding the rest of the block. Sew to the pin. Remove the pin and continue around the rest of the curve in the same manner.
  g.   When you are about an inch away from the end you can hold onto the last pin and sew to the end or I sometimes like to remove the pin and use my Sew Easy Tweezers to grab the top fabric and hold it up with the tweezers and guide it to the end.

2.  Press seam away from shape B. Press gently from the back, flip block over and press from the front.


Making the Blocks


Make 32 Half Square Triangles (HST) using the light  and the red 5" squares of fabric. HST will finish at 4" (4 1/2" unfinished size)

a. Draw a diagonal line on the back side of the light fabric.

b. Pair up a light and a red fabric, right sides together.

c. Sew 1/4" on each side of the line.

d. Cut apart on the line.

e. Press open and trim ears.


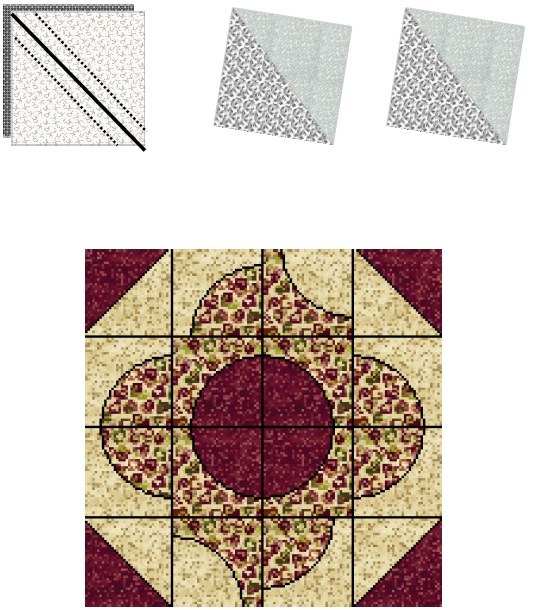
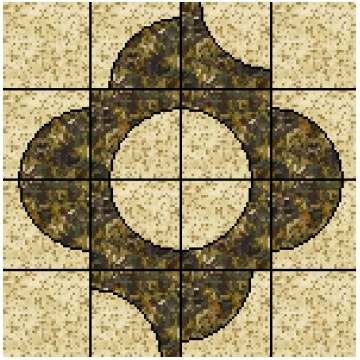
Block One - make eight

Use the small heart and background fabric shapes along with the HST to make Block One.


Block Two - make eight

Arrange pieced Drunkards Path blocks using the dark green and light fabric and 4 1/2" squares of  light fabric.


Sew the Blocks Together


a. Alternate blocks One and Two as shown on page 1.

b. Sew together into rows.

c. Press the seams of each row in opposite directions.

d. Sew rows together.

e. Press seams.                 


Inner  Border


a.Cut border fabric into 1 1/2" strips. 

b.Piece strips together, end to end.

c.Measure the quilt from top to bottom, measure in the center.

d.Cut two strips to this measurement.

e.Sew a strip on each side of the quit.

f. Press seams out away from the top.

g.Measure the quilt from side to side, this time including the two sewn on borders. 

h.Cut two strips to this measurement and sew onto the top and bottom of the quilt.

i. Press seams out.


Outer  Border


a. Measure the quilt top.

b. Piece together four strips using the outer border fabric to this length.

c. Sew a strip to each side of the quilt.

d. Sew a 4 1/2" medium green square to each end of the remaining two strips.

e. Sew these two strips to the top and bottom of the quilt top.


Binding


  1. After quilting your top you will need to bind it by doing the following; sew the binding strips right sides together, end to end, to make one long, continuous strip. Press the strip in half, wrong sides together lengthwise. Roll into a loose ball to make handling easier.
  2. Sew to the front of the quilt, mitering at the corners. Press over and turn to the back. Sew to the back by hand or machine.
    1. Make a label for your quilted treasure and enjoy.


www.backporchdesign.com


Download and Print Instructions


Check This Out!

Check out the most popular tool on QuiltingHub. Use the search 'Map Of Resources' or the 'Resources Trip Planner' to the right (or below).


Glossary

Background Fabric
The fabric used as the background when placing Applique pieces.
Backing
The fabric on the back of a Quilt Sandwich (Top, Batting and Backing).

Same As: Lining
Binding
Binding is used as both a noun and a verb. As a noun it is the fabric that's used to cover the raw edges of the quilt sandwich after it's quilted. This edging fabric is referred to as the Binding (noun). As a verb it is the process of putting on this fabric, and it referred to as Binding a Quilt.
Block
The basic unit of a quilt top, usually square but can be rectangular or other shapes. Blocks can be pieced, appliqued or plain.
Border
A strip of fabric or pieced strip of fabric joined to the edges of the inner quilt and used to frame it.
Finished Size
The final sewn measurement or dimensions of a completed block without seam allowances. Thus a 6" sewn measurement block would be cut 6.5" to allow for 1/4" seam allowances.
Label
Information some people attach to a quilt that may contain the your name, name of the quilt, town, year and pattern used.
Lining
The fabric on the back of a Quilt Sandwich (Top, Batting and Backing).

Same As: Backing
Press
Method of using an iron to press seams and blocks. This means simply pressing downwards on the seam with the iron from above and not moving the iron back and forth which can distort the block or seam.
Presser Foot
The removable sewing machine accessory surrounding the needle that holds the fabric in place.
Pressing
Picking a hot iron up off your fabric or quilt top and then putting it down in another place to remove the wrinkles. When you press your fabric, you do not slide the hot iron.

See Also: Ironing
Quilt Top
The top layer of a quilt Sandwich.
Rotary Cutter
A very sharp tool that looks like a pizza wheel which is capable of cutting through multiple layers of fabric.
Strip
A construction technique in which long, narrow pieces of cloth are joined lengthwise, sometimes with long rows of quilt blocks, to form a quilt top. The term "strip" can be used to describe the long pieces of fabric between blocks (see Sashing) or to describe the small, narrow remnants used in string patchwork.

See Also: Sashing
Template
Pattern pieces made out of paper, cardboard, plastic or metal, giving you something to draw around so that you can accurately replicate any shape.
Author
System Admin
Search Articles
Map Of Resources Near
Resources Trip Planner